Minibike sidecar ideas: A complete guideline on the plans and preparations of building a sidecar to your minibike.
We use affiliate links and may receive a small commission on purchases. Read more about us.
Whether it is for transporting your kid or going for a recreational drive with your pet, installing a sidecar to your minibike always helps to make your minibike look eccentric.
It may look nice to have a sidecar, but installing one can be tough without proper instruction and guidelines.
For any reason, if you are thinking about installing a sidecar on your mini bike, we are here with the proper steps and guidelines you can follow to complete the task with optimum proficiency.
If that seems relevant to you, all the following discussions should give proper clarification to your job. If you are interested, let's get started-
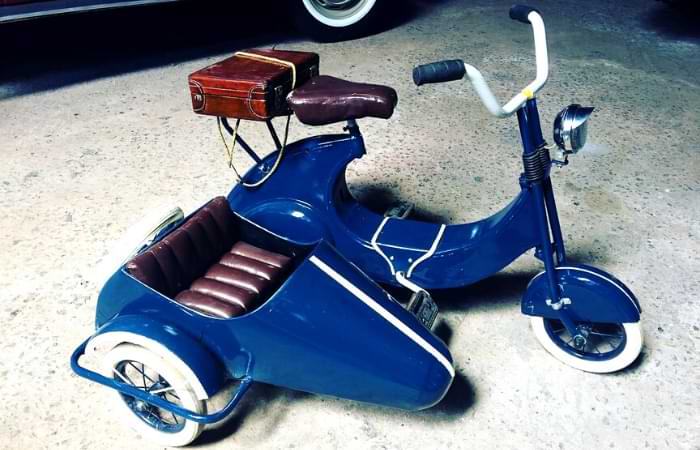

Should you buy a readymade sidecar or build one for your minibike or motorcycle?
Doing the actual work on your own is one kind of affair, whereas purchasing a new one is something completely different. When it comes to installing a new sidecar to your minibike or motorcycle, the first thing that comes to mind is whether you should build or purchase one. Here are two of the most prominent factors that will help you to take a proper decision-
1. The first thing you need to keep in mind is whether you have enough time or not. Building a sidecar can consume a lot of your time and energy as a beginner. If you have never done the job before, making out the proper framing and timeline can give you a baffling experience as well. Therefore, only get into the work when you have the appropriate amount of time and courage to do the job on your own.
2. The next essential thing to keep in mind is whether you are ready to accept your mistakes or not. If you lose your patience in case any complications appear, it is better to purchase one sidecar from any online platform or a nearby store. But if you dare to do the job on your own no matter what type of complications appear, get into the process without any fear at all.
Minibike sidecar ideas
Now that you are determined to do the job on your own, it is time to get into the real discussion. We have categorized this section into some subcategories so that things become easier for you to complete the task. Without protracting the article much longer, let’s get into it –
Speculate your bike
Before installing a sidecar to your motorbike, it is important to give a good look at the bike and its power capacity so that you face no trouble while transporting your little member or anything on that particular sidecar.
If you have an on-road motorcycle, installing a larger sidecar should not create any problem. But if you have a minibike like Coleman, the sizing of the sidecar is always an issue. Always try to create a considerate amount of space so that the mini bike does not face any trouble while driving.
We know that the size of the sidecar is less important than some other aspects. But it is always worth mentioning.
The following sections are where we have pointed out the major discussion-
Framing is more than important
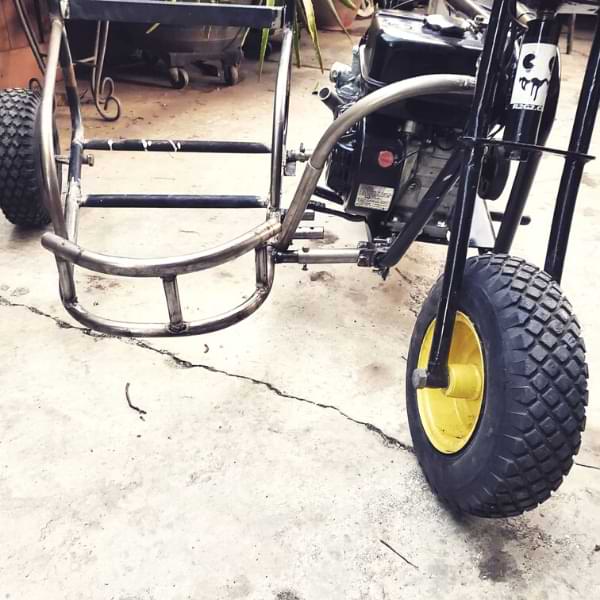

Layering and designing the frame is one of the most crucial aspects everyone should give most priority to. If one can make the framing perfect, there is a high chance that he will be able to do the installation with ease as well. Here are some of the tips you may follow while planning for the frame-
- It is always possible to build the frame using aluminum, steel, or wood. If you want high-end durability, a steel frame is the most convenient option.
- Having a good sense of the sizing and dimensions always helps to design the frame with more clarity.
- Always take a reference so that you can alleviate the chance of mistakes unless you are super creative. If you have been doing this sort of activity for a long time, framing should not give you any trouble at all.
- The internet web is loaded with thousands of references that you can look for to find your appropriate one.
Don’t underestimate the size and dimension
Sidecar size | Recommended Dimension (LxWxH) |
Smaller | 35x35x25 inches. |
Larger | 60x25x32 inches. |
We have mentioned in the previous section as well that the size and dimension of the frame matter more than anything. Here goes our recommendation in terms of sizing and dimensions-
When your preference is to transport smaller kids or dogs, having a length of around 35 inches should suffice. The width and height, in that case, should be respectively 35 inches and 25 inches. That means a smaller sidecar should come with a dimension of around 35x35x25 inches. Indeed, you can always go for doing some adjustments according to your preference.
On the other hand, having around 60 inches of length should suffice when it comes to building a larger sidecar for your minibike. In that case, the dimension of the sidecar frame might be around 60x25x32 inches. That is just a recommendation for giving clarity. You can always adjust the size and height according to your preference.
What would be the materials?
When it comes to durability, materials play the most important role. The durable the materials, the better support you can expect to get the frame and sidecar.
Frame material
We have already mentioned once that framing is always a crucial aspect. Therefore, having good quality frame materials helps to keep the body intact in one place. The three most popular options for building the frame of the sidecar are:
- Steel
- Aluminum
- Wood
Body material
Once the frame is complete, building the body is what gets the high-end priority. Here are some of the essential materials to complete the bodywork
- Stainless steel.
- Plywood.
- Cloth (less popular).
Think about the wheel as well
Thinking about the wheel is no less important than the frame and the bodywork. The wheels are the things that ensure the free-flowing of the sidecar when you will be on the go with your mini bike, bicycle, or motorcycle. Here are some of the important tips about picking up the right wheels for the sidecar-
- When the sidecar’s dimension is relevantly smaller, the size of the wheel should not be any larger than 20 inches.
- On the other hand, you can also think about installing a larger wheel when the frame and body size are relevantly larger. In that case, having a wheel size of around 25 inches seems logical.
- Whether you should add two or three wheels to the frame depends on the frame design. When the frame is a little triangular in shape, installing three wheels may bring a wholesome experience. On the other hand, a quadrangular frame may work well with two wheels.
We have to mention again that giving priority to your own preferences always brings the most wholesome experience. Therefore, trying to be a little creative is never an issue at all.
Materials needed
Once you are ready with all your plans and preparations, getting into the actual work is the only step left. But before that ensuring whether you have all the necessary materials or not is also important.
- Bolt
- Screws
- Driller
- Sharpener
- Attachment kit.
- Screwdrivers and many more.
Never or ever get into the DIY applications unless you have the right tools near you. Otherwise, you will have to suffer a great deal in the middle of the work.
Completing the real work


Here is the step-by-step process that will help you to complete the job. No matter whether you are building a smaller or larger sidecar, these steps should be universal to almost all sidecars building processes. At the end of the day, it is the improvisation where you need to do the real artwork-
- First of all, start working with the frame. The frame is the exact place where the whole body will rest. Therefore, completing the frame is always the first prerequisite in any case.
- Second of all, attach wheels to the frame. Ensure that you have all the necessary bolts and screws so that you do not have to struggle in the middle.
- Furthermore, work on the frame and give it a good finishing. Ensure that the body is stable enough on the frame so that you do not have to face any trouble in the long run regarding safety.
- Moreover, once you have completed attaching the body and the wheel to the frame, you have to attach the whole sidecar to your minibike. Now, this step is the most complicated job available. But when you have the right knowledge and guideline, you should be able to complete the job with enough proficiency.
- Finally, ensure all the properties that will ensure high-end safety. When attaching the sidecar to your minibike makes it vulnerable, it can never turn out to be an ideal attachment at all.
Safety comes first
Doing the hard work on your own but not getting enough safety from the item does not justify the whole hard tearing of your at all. You can only get on the road when the mini bike is safe and stable enough to support you while making a turn or gearing up your minibike. Here are some of the tips to make the sidecar safer on your mini bike-
First of all, ensure that all the measurements are valid and accurate so that turning on a specific route does not crash the whole minibike.
Moreover, ensure that you have tightened up all the screws and bolt conveniently. Otherwise, getting a stable performance from the mini bike will never be attainable.
Finally, give a test drive to find out whether you have made any miscalculations or not. Doing so should give more clarity to your process.
How much does it cost to build and install a sidecar on your mini bike?
Build type | Total cost |
Readymade. | $50-$275 dollars. |
DIY build. | $50-$200 dollars. |
Installation cost. | Around $30-$50 dollars. |
Readymade installation in total. | $80-$300 dollars. |
In total cost for DIY installation. | $80 dollars to $250 dollars. |
Building and installing a sidecar to your mini bike on your own should not cost more than $250 dollars, whereas installing a readymade sidecar will cost you at a max of around $275 dollars.
You will always have the option to minimize or reduce the cost according to your preferred installation type.
Final summary
- Transporting your pet to a small kid is always easier when you have a stable sidecar installed on your mini bike, bicycle, or motorbike.
- The procedures and methods we have discussed above should work well with most applications.
- Completing the DIY installation will help to save some of your bucks than purchasing a readymade one.


